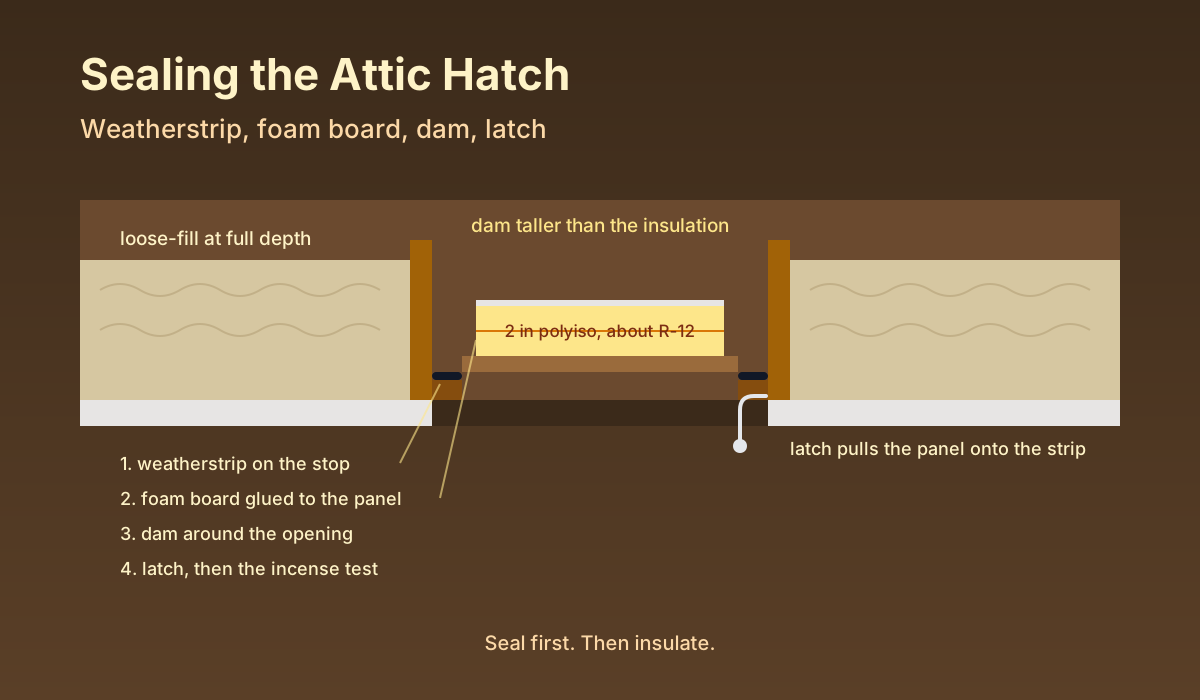
The November checklist ends its attic item with one line: while the hatch is open, weatherstrip its edge. This is that line turned into a Saturday.
An attic hatch is the highest hole in the house, which makes it the worst one. Warm air rises, pressure builds against the ceiling, and the hatch is a piece of unsealed plywood sitting on a bare wooden stop with daylight at the corners. Everything you spent on attic insulation gets a thirty-inch bypass.
One honest note before the steps. The radar brief that put this post on the schedule asked for photographs from the writer's own attic. I don't have a set I'm willing to pass off as a record of this exact job, so this is a walkthrough in words and a diagram, with the dimensions and the order spelled out carefully enough that you won't need the photos. If that bothers you, the ENERGY STAR guide linked below has drawings.
Why the Hatch Beats a Thin Spot
Insulation slows heat conducting through a surface. It does nothing about air moving through a gap, and air moving through a gap carries heat and water vapor with it. That's why ENERGY STAR's seal-and-insulate guide puts air sealing ahead of adding insulation, and why the hatch is on its short list of attic bypasses alongside recessed lights, the chimney chase, and plumbing stacks.
The code treats it the same way. The 2021 IECC, R402.2.4, wants access hatches and doors weatherstripped and insulated to a level equivalent to the surrounding surface, with a baffle or retainer so loose-fill insulation can't fall through the opening. Equivalent to the surrounding surface is a tall order. In zones 4 to 8 the ENERGY STAR R-value table points at R-49 to R-60 for the attic floor. Nobody glues ten inches of foam to a hatch; what you do instead is stack as much as the door can carry and make the air seal good enough that the rest doesn't matter much.
How much of a difference can one small panel make? Enough that the four jobs below are the cheapest thing on any attic list, and I'd do them before buying a single bag of cellulose.
Step One: Weatherstrip the Stop
The hatch rests on a wooden lip, the stop. That's your sealing surface.
Clean it. Dust and old paint flakes kill adhesive. Then run self-adhesive weatherstrip around the whole perimeter of the stop, where the hatch panel will land. Closed-cell foam tape is the cheap option and works for a year or two; EPDM rubber or a compressible silicone bulb lasts longer and springs back after the panel has sat on it all summer. Overlap nothing; butt the ends cleanly at the corners.
Then look at the frame itself from the attic side. The rough opening between the hatch frame and the ceiling joists is usually a finger-width gap hidden by trim below. Fill it with low-expansion foam or backer rod and caulk. This gap leaks more than the panel does, and almost every hatch I've looked at skipped it.
Step Two: Foam Board on the Back of the Door
Cut rigid foam to the size of the hatch panel. Polyiso gives roughly R-6 per inch and EPS about R-4, so two inches of polyiso is about R-12 and three layers of one-inch EPS about R-12 as well. Glue the layers to each other and to the panel with an adhesive labelled for foam; ordinary construction adhesive can eat the board. Stagger the seams if you stack layers.
Keep the foam slightly smaller than the panel, an inch in from each edge, so it clears the stop when the hatch drops into place. The weatherstrip seals on the panel's rim, not on the foam.
The attic hatch is the highest hole in the house and usually the leakiest; weatherstripping it costs less than one bag of insulation and does more.
Now the fire question, because it's real. Foam plastics are covered by IRC section R316, which generally requires a thermal barrier over foam, with a lighter ignition barrier allowed in attics that exist only for servicing utilities. Whether an inspector applies that to the back of one hatch panel varies by jurisdiction, and I'm not going to pretend otherwise. My own rule: face the foam with a thin sheet of plywood or hardboard anyway. It satisfies most inspectors, and it stops the top layer crumbling every time the panel gets shoved open with a flashlight in one hand.
Step Three: Build the Dam
Loose-fill insulation flows. Open the hatch on an attic blown to R-49 and a wave of cellulose comes through the hole, every time, until the ring around the hatch has thinned to nothing.
The fix is the retainer the IECC asks for: a dam around the opening, as tall as the insulation is deep. Plywood or OSB strips screwed to the framing work, and so do rigid foam offcuts stood on edge and foamed at the joints. Make it a couple of inches taller than the finished insulation depth, which for R-49 in cellulose is roughly thirteen to fourteen inches and for R-60 nearer seventeen. Then bring the attic insulation up against the outside of the dam at full depth, and leave the inside of the dam clear so you can step through.
While you're there, check what's near the hatch. A bath fan duct that terminates inside the attic is the single most common thing people discover during this job, and the moisture article explains why it has to be fixed before any insulation goes up, hatch included.
Step Four: Latch It Shut
Weatherstripping only seals under compression. A hatch panel lying under its own weight on a rubber bulb compresses it a little; a hatch panel pulled down tight compresses it properly.
Two hook-and-eye latches on opposite sides, or a pair of sash locks, pull the panel onto the strip. If the panel is the lift-and-slide kind with nothing to latch against, add a strip of wood to the frame so there is. Pull-down stairs already have a latch; what they lack is a lid. For those, build a box from two-inch foam that sits over the folded stair on the attic side, weatherstrip its bottom edge, and either buy a zippered tent kit or clamp the box down with a couple of toggles. The frame-to-joist gap on a stair unit is wider than on a hatch, so go back to Step One for it with the foam gun.
The Test, and the Thing It Usually Finds
Pick a cold, breezy day. Close the hatch, latch it, and from below run a lit incense stick or a smoke pencil slowly around the edge. Smoke that drifts upward at any point marks a leak; go up and find out why. A blower door test is the honest measurement, and if you have one scheduled for the whole house anyway, do the hatch first so the number reflects it.
Nine times out of ten what the test finds isn't the panel at all. It's the trim gap or a hatch that doesn't sit flat because the stop was painted lumpy decades ago. Plane the stop. Replace the strip. Try again.
Where This Fits
Here's my opinion, and the people who sell cellulose by the bag may disagree: the hatch and the other attic bypasses are worth a full afternoon before the first bag is opened, because insulation poured over an unsealed ceiling is a filter, not a blanket. Once the ceiling plane is tight, the attic insulation cost calculator will tell you what the depth itself costs, and the cellulose cost breakdown covers what a crew charges against doing it yourself. For the ducts that may be sharing the attic, the duct insulation guide is the companion piece, and it opens on the same order of operations. Seal first. Then insulate. The hatch is just the place where that rule is easiest to see and cheapest to follow.